
Move over Scotch, there's a new tape in town. Washi is similar to masking tape but available in tons of patterns and colors. Ready, set, get stickin'!
Supplies:
-Dry Erase Marker in a light color (avoid black)
-Scissors
-Washi tape, happytape.com
Instructions:
1. Using the dry erase marker, create your design, which will guide you when it comes to placing the tape. (The marker is great for this project because it wipes right off, in case you make any mistakes!)
2. Once you’re set with your design, begin applying tape to the pumpkin's surface. Try using as many longer pieces as possible. (Piecing together too many short strips will look sloppy.) For this design, begin at the stem and run your tape down, erasing the marker's lines as you adhere the strips to the surface, and finishing at the bottom of the pumpkin. After all of your vertical stripes are made, apply tape around the circumference of the pumpkin to finish off your pattern.

Gold. Silver. Bronze. Sophisticated enough to sit on the mantel or step in as a table arrangement. This year’s harvest gets the Midas touch.
Supplies:
-Damp Rag
-Newspaper
-Metallic Spray Paint, krylon.com
Instructions:
1. Make sure you're in a well-ventilated area and place newspapers on a flat surface. Before beginning, wipe down pumpkin with a damp rag to remove any dirt, which will get in the way of a smooth surface.
2. Holding the pumpkin by the stem, spray the entire surface area until every inch is covered. Allow the pumpkin to dry; then apply a second coat. Let dry for at least 24 hours. Note: The more coats you apply, the darker the color will appear.

Can't commit to one look for the season? Thanks to chalkboard paint, nothing needs to be permanent.
Supplies:-Newspaper
-Damp Rag
-Chalkboard Spray Paint, homedepot.com
-Chalk
-Pencil (for Cat)
-Scissors (for Cat)
-Black construction paper (for Cat)
-Glue Gun (for Cat)
Instructions for the Ghost:
1. Take supplies to a well-ventilated area and place newspaper on a flat surface. Before beginning, wipe pumpkin with a damp rag to remove any dirt that will interfere with a smooth finish.
2. Hold pumpkin by the stem and spray the entire surface area. Allow pumpkin to dry; then apply a second coat. Stand and let dry for at least 24 hours. Once dry, take your chalk and start drawing.

A perfect example of what to do with that extra stash of Halloween sweets. Just one thing: Please don't eat the props.
Supplies:
-Dry Erase Marker in a light color
-Candy: Black and white licorice pinwheels; coconut jellybeans; black licorice jellybeans
-Hot Glue Gun
Instructions:
1. Using your marker, first create a design. We decided to do a few floral patterns scattered across the pumpkin.
2. Once you're happy with your pattern, use your glue gun and adhere the candy to the pumpkin's surface. Set aside to dry for at least 24 hours so that the candy can set in place.
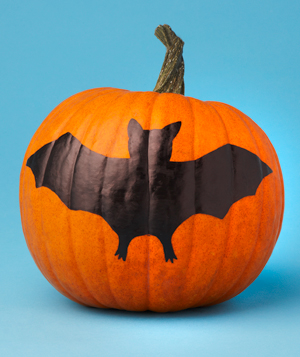
Look what just landed on your pumpkin. No paintbrush (or paint!) required.
Supplies:
-Paper and Pencil
-Scissors
-Masking Tape
-Permanent Chisel Tip Sharpie in Black
Instructions:
1. Draw a bat design on any scrap of paper; cut it out. (For this project, stick to classic icons that are easier to recognize–and draw. We also like ghosts, cats, and spiders.)
2. Tape the paper template to the spot on the pumpkin where you'll be drawing your bat.
3. Trace your "stencil" with the marker. Then remove the paper and color within the lines using that same marker.

Spotted: Yet another New Use for a Household Item. A home office supply gets a new turf to play on while personalizing pumpkins with a monogram or house number.
Supplies:
-Dry Erase Marker in a light color
-Tacks
Instructions:
1. Using your dry erase marker, draw the number or letter on the pumpkin. Don't be fooled, making a straight line on a pumpkin is not as easy as it looks! (This marker is great to have on-hand because it lets you make plenty of mistakes that wash right off.)
2. Once you're set with your design, begin tacking. You'll want to erase the pen's markings as you stick each pin into its proper place.

Come on, we couldn't go a whole season without seeing this smile. Just like Jack—but a much easier toothless grin to create.
Supplies:
-Black tissue paper
-Scissors
-Dry Erase Marker (in a light color)
-ModPodge
-Foam brush
Instructions:
1. First, think about the expression you'd like your pumpkin to wear. Start by cutting out three triangles (two for the eyes and a smaller one for the nose), then make a half moon shape for the mouth. Cut out square spots for the missing teeth.
2. Using the dry erase marker, draw the face as you'd like for it to appear.
3. Dip the foam brush into the ModPodge and apply to one side of each piece of tissue paper. Adhere to the pumpkin.

Who says pumpkins can't pull off polka dots? Bet you've got a bunch of buttons that remain unclaimed–the more mismatched, the better!
Supplies:
-Buttons
-Hot Glue Gun
Instructions:
1. Apply hot glue to the back of the buttons and adhere to the pumpkin's surface. Hold for 5 to 10 seconds to secure. Playful polka dots don't need a specific order so have fun sticking them wherever you please.
2. Set aside to dry for at least 24 hours.
No comments:
Post a Comment